
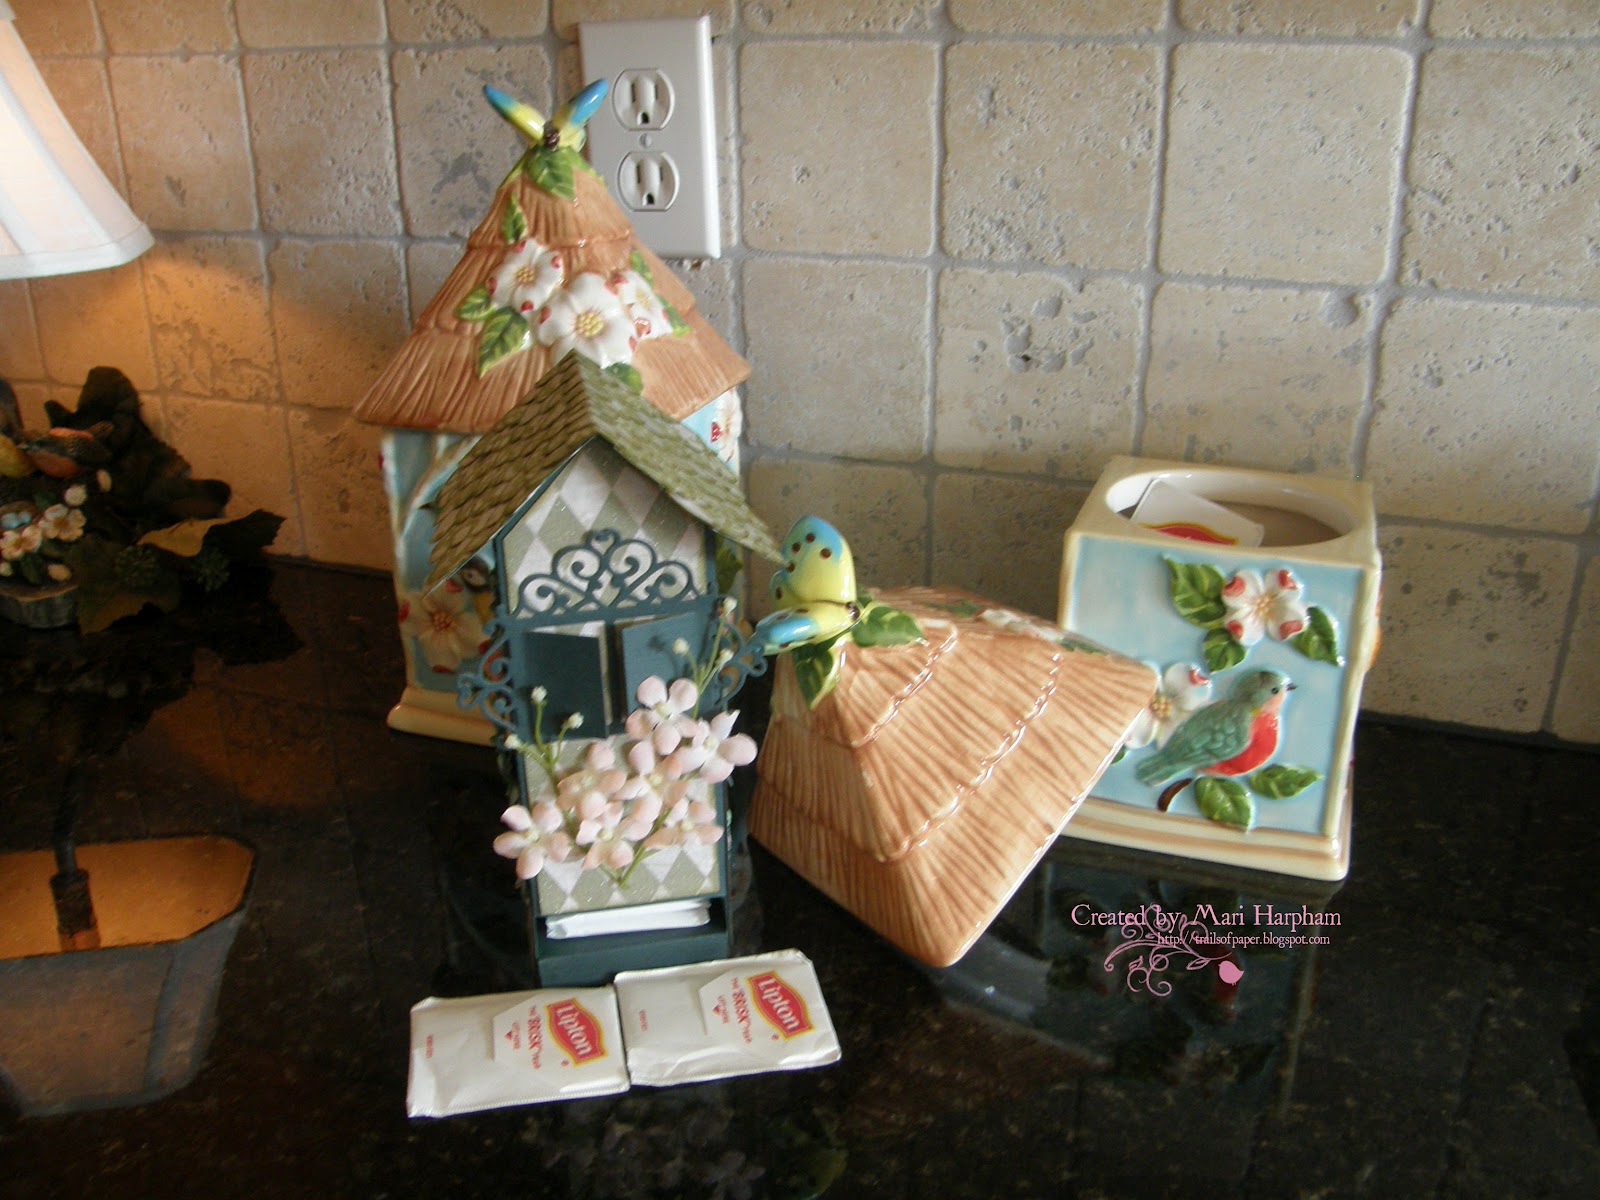
Tea Bag dispencer - Today's challenge at Alphabet Challenge blog is K for kitchen. Well, I decided to make something for my Kitchen. I have seen these Tea Bag Dispencers a few times on varies blogs, but I had a devil of a time finding one when I was ready to make one. So I really just kind of made it up as I went along. I will tell about the process at the end of this post for anyone interested in making one.

My kitchen is decorated with birdhouses and this is a shoot of the dispencer in my kitchen.
I am one of the few Americans who really enjoys a cup of hot tea in the morning and I only like the plain old Lipton. I have tried other flavors, but I just don't care for them, so this is a very practical project for me.

Here is a close - up of the front. I used HCSB die to cut the window. The flowers were my mother's. Many of you know that my mother passed away a few weeks ago and she was a hoarder. This were in her things and my stepfather let me take a few. I like the thought of having something that was hers in my kitchen.

My papers are Prima's Nursery Designs. I inked it with Ranger's Forest Moss.

Here is the side. The swirl is MD die cut.

The flowers are Prima's and I misted them with Tattered Angels Gumdrop mist. I used sparkly brads for the centers. The pink rosebuds are Melissa Frances.

To make the body of the dispencer, I used a 12 x 12 sheet of cardstock. I just eye-balled ( yes, that is a valid crafting term - LOL) the height that I wanted and cut the rest off.
Now at this point is when I measured my tea bag. I wanted them to lay flat and have a bit of wiggle room so that it would be easy to pull them out, so I rounded my measurement up a little. Now I was ready to score.
My first scoreline was for the back, then the side, front and the other side. I did not cut the extra off. The extra length will be used to glue the back piece with.
Next I cut about an inch and a half of the bottom of the front. This will make the finger grip at the bottom.
I then turned my attention to the containers peak. The cardstock is still flat at this point, so is fairly easy to work with. I cut down the 4 scorelines to where I wanted the roof to stop. I then cut off the sides between the score lines.
The next part was to make the peak on the front and back. I found my center on the front and cut from the center to where my score line was cut down to. Repeat for the back.

This is roughly what your cardstock will look like at this point.

Now for the floor platform. It is important that you have a bit of a platform to make it easy for your fingers to be able to pull a teabag out without hitting your finger on the counter. It is just a typlical box lid that is put in, in reverse.

The roof is another box lid that I cut the front and back side from. Just scoring where the side are.

This is the top of the roof. I cut about little circles and inked them all to make my shingles. It was a pain staking process, but I am so pleased with the end result.

This is the side view with the roof.

The roof sitting on the counter by it's self.
Another shoot of it in my kitchen.

The roof on the dispencer.

Another angle of the roof.

So you could see how the roof fits.

Ta da!! In my kitchen!
Pile it on Challenge #26 make your own Embellishments
The Paper Shelter #70 Punches/dies
C Inspirations #169 Anything goes
Crafty Creations Challenges #176 Embellishments
Charisma Cardz #25 Anything Goes
Stampin For the Weekend #12 Your Style
Crafty Catz Weekly Challenge #139 Metal (brads)
Fussy and Fancy Challenge #66 Fancy Folds
Belli Challenge #146 Anything but a card
Fabulous!!
ReplyDeleteMargaret xx
Mary your Tea dispenser is GORGEOUS!! I love it! What a fabulous design with so many beautiful details!!
ReplyDeleteHugs, Tammy
Wow, this is stunning! What a fabulous idea, it looks amazing and perfect for your kitchen. Thank you for joining us at Charisma Cardz this week. Hugs, Jill x
ReplyDeleteA great card hun! Thanks for playing along with our Anything Goes challenge over at Wednesday's Creative Inspirations Challenge Blog this week! xxx
ReplyDeleteOh WOW I love your tea bag dispenser, so ingenious :-)
ReplyDeleteThanks for joining Fussy and Fancy for our fancy folds challenge and good luck!
xx Happy crafting and glittery hugs xx
Sazzle
wow !!!! what a fab craetion
ReplyDeletethank you for joining us at crafty catz this week
linda x
Wow this is amazing and something I totally need in my kitchen! Thanks for playing along with us at Charisma Cardz this challenge!
ReplyDeleteLisa xox
what a gorgeous project - looks fantastic! thanks for joining us at CraftyCatz this week
ReplyDeleteKim x
I love this xx Jan
ReplyDeleteFabulous idea!! Love your cesign and the wonderful color choices! Thanks for playing with us at The Paper Shelter.
ReplyDeletewow loving this and so glad you joined us at Crafty Catz this week
ReplyDeletethis is stunning! absoluletly gorgeous, wonderully made! (i think i need to make one like this ;) thanks for the Tut!)
ReplyDeletehugs from Fussy-DT Laila
Congratulations Mari, you have been hand picked as one of our Top 5 from the fancy folds challenge over at Fussy and Fancy :-)
ReplyDeleteGreat project and fantastic tutorial too!
Please pop over to our blog pick up your blinkie.
xx Happy crafting and glittery hugs xx
Sazzle
Wonderful project - I love it!
ReplyDeleteSandy
What a great project. I love all the details. Thanks a lot for the tutorial.
ReplyDeletelg
Sabine
wow!!how perfect is this?! i'm gonna have a go at making one of these!! xx
ReplyDelete